Wednesday 27 July 2011

Komickrazi Studios... now with more Vacuum form table AWESOMENESS!

Woohoo! I am now the proud owner of a vacuum form table and it's fffff..... omg so AWESOME!
Although I could have built one, I took the easy way out and bought a pre-made vacuum form table. I decided it really came down to time or money... and since my time is pretty limited, I couldn't spare the several weekends it would have required to make one. My table was purchased from here: http://www.WidgetWorksUnlimited.com/Vacuum_Formers_s/35.htm
I got the 12x18 model, which is just loverly for my needs ^_^

My hubby was really against me using the house oven to heat plastic (nothing like eating all those carcinogens the plastic vapors would leave behind!), so we built a portable oven. Nope, I didn't break a toaster oven or oven range for my plastic oven, I got some real current producing coil and made what can only be described as a "bake" box. I got the 110 volt coil at Workshop publishing: http://www.build-stuff.com/
You must buy his vacuum form table instructions on order to get the heat element kit, but it is so worth it. Maybe in the future I will make a single vacuum form table with attached heating element, but for now, I have two separate pieces ^_^ Glee!

Now... for my first table test!

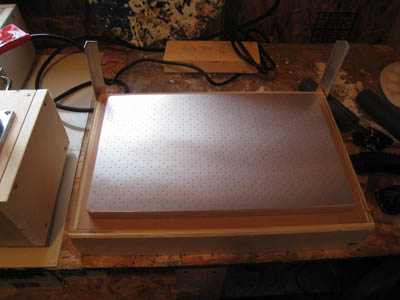
Here's the Vacuum form table; pretty straightforward... put hot plastic on and turn on vacuum.


Here's the oven box... as you can see, it's got a coil of conductive wire running along the inside of the fire retardant board which is inside a galvanized metal box. That box is set in a wooden frame. The switch and plug on the side are wired to the element. When the oven is "On" the light turns on. The plug is for the shop vacuum (this is so the oven is not on while the vacuum is on - you don't want to pop a breaker!).


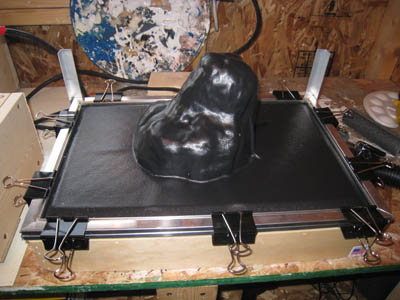
I'm using black ABS plastic 1/8" thick. It's sandwiched between two metal frames that are held in place with bulldog clips.


Leather gloves are on... we are GO for a test pull!


Omg.... the plastic is sagging! It's so exciting! We're ready for vacuum forming!


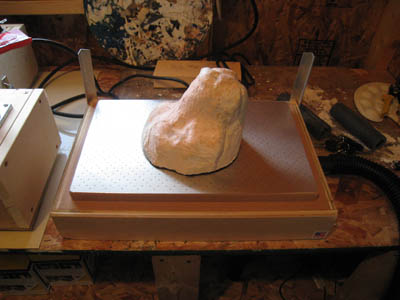
Here's my male mold ready to go...


Plastic is on.. vacuum is vacuuming.


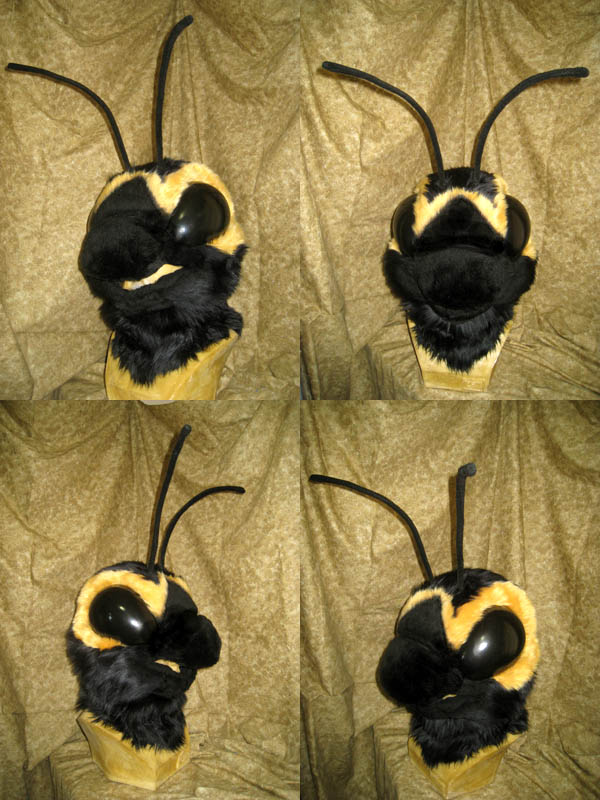
Success! The head was cut out with a dremmel. It needs some touch ups still, but I'm proud of my first cast!


Whee! Oh Vacuum form table... so wonderful! We are going to have so much fun. 0_o Ah the cosplay possibilities!

Sunday 17 July 2011

Her Royal Majesty Queen Beatice... or Bea for short

Hurrah! My first insect fursuit is complete.
Presenting Bea the Bee >_<

Bee's big eyes are one of those paintable easter eggs you find in craft stores around easter. I cut one in half and painted several layers of black and glossy sealant. The antenna are pieces of 14 gauge wire folded in half and covered with fleece. They are fully manipulatable. The eye screen is located right in the middle of her face :D Since Insects have bisected faces, I added a strip of buckram in between the foamwork for her head and her mouth sections.


Her wings are made of 14 gauge wire and cellophane wrap. The wings were bent into shape and the veins were soldered into place around the frame. The wire wings were then sandwiched between several layers of cellophane wrap (the stuff used to wrap up gift baskets) with some spray adhesive, and "sealed" with a heat gun. The rigging for the wings was made with a piece of Vegetable tanned leather and a metal brace (sorry, I didn't take a photo of the brace!) I covered all the work with fur and fleece to make it look neat and clean and added straps of nylon and buckles that cross over my chest to hold the rigging in place. A set of washers on a wire frame were used so a simple wing nut can be slid through the holes and tightened to hold the wings in place. There are two slits in the back of the bodysuit that you can slip the rigging through before attaching the wings.


Her extra set of legs are pool noodles covered in spandex. I wear a spandex body suit with shoe soles attached directly to the bottoms of the feet to give the impression of insect legs. It makes her quite cool and comfortable to wear!

Splat!


Sadly, a really silly photo, but a great view of her back:


And a video to see Bea in all her glory: http://www.flickr.com/photos/wildrosecritters/5944860332/in/photostream

Monday 11 July 2011

Phew! *dusts off my journal* It's been awhile since I updated my bunraku progress....
Why? Layers and layers of latex of course!


I normally like to do slush casts, but due to it's size, I thought it best to add several layers of latex, to both halves, then sandwich them together. After MANY layers of latex, the pieces are finally ready to put together. I added a generous amount of latex all around the edges of the two halves, then smushed them together. Then, I went over the cracks with more latex to make sure the two layers are sealed.


It will take a couple of days for the latex along the seams to cure. Then I will fill the hollow interior with soft expanding foam.